

How To Install A Culligan Whole House Water Filter
I have replaced a whole-house water-filter sediment cartridge, and it was easier than I thought information technology would be. Here'southward how I did it.
Why Use a Whole Firm Filtration Organization?
"OH, CULLIGAN MAN!"
When a home is running off of a safely treated private well or your h2o has a high mineral and droppings content, you can notice an abundance of minerals, sediment, and even iron in your drinking, bathing, and cooking water that needs to be filtered out. In the past, many people bought a whole-firm filtration system and installed it just for this purpose.
Nosotros ran beyond 1 of these backdrop and discovered it was well beyond fourth dimension to change the sediment cartridge, so we decided to take on the challenge. Being our first try at such a matter, nosotros took pictures of our take a chance. Changing a water-sediment cartridge was a pretty easy task, fifty-fifty for start-timers like u.s.a.; this is how we did information technology.

Home Plumbing Fabricated Easy
K9keystrokes
Water Filter Cartridge Replacement Guide
Following the written preview of steps i through vii listed here, a moving picture-by-picture guide will take y'all through the filter-alter process one step at a time with easy-to-follow directions for each photo. I recommend wearing condom goggles during the project, every bit water can spray towards your face, and it may have particles from the captured sediment of the one-time filter. You will as well want to identify a bucket nether the water-filtration assembly to catch any water as it flows out of the housing during the project.
Preview of Project Steps 1–seven
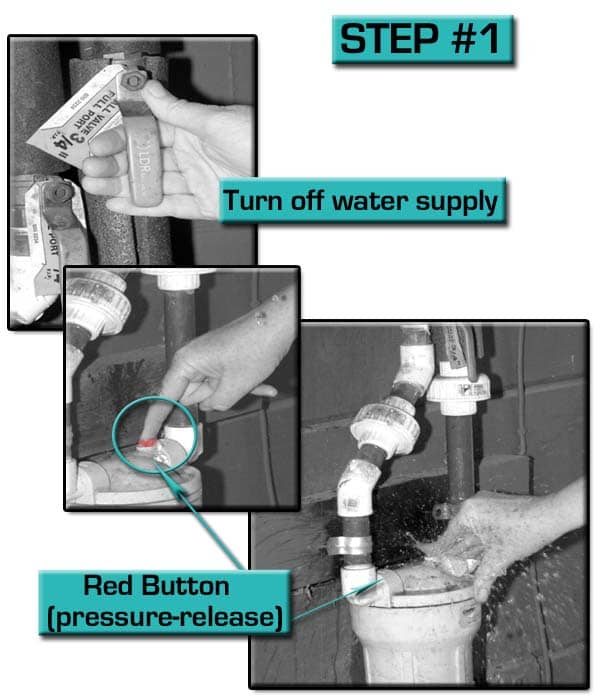
- Plow off the water supply. Press the scarlet pressure-relief push. Rotate handle to OFF or Featherbed position.
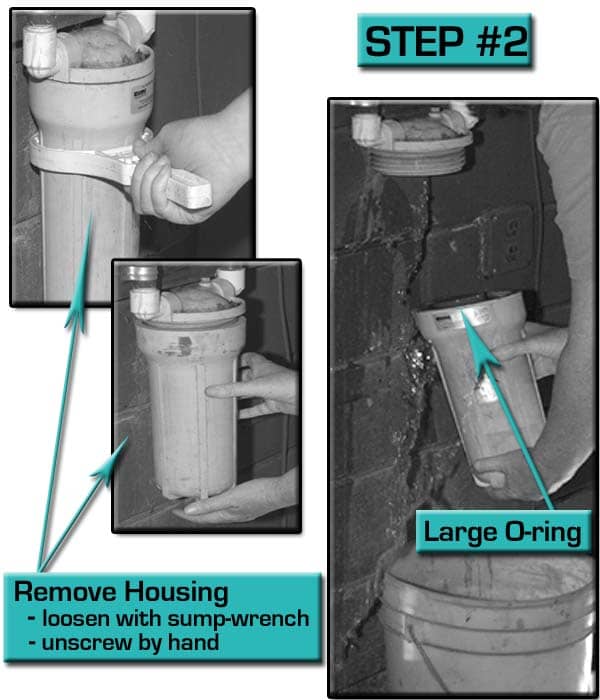
- Unscrew housing. Remove large O-ring, wipe it make clean, and set up aside.
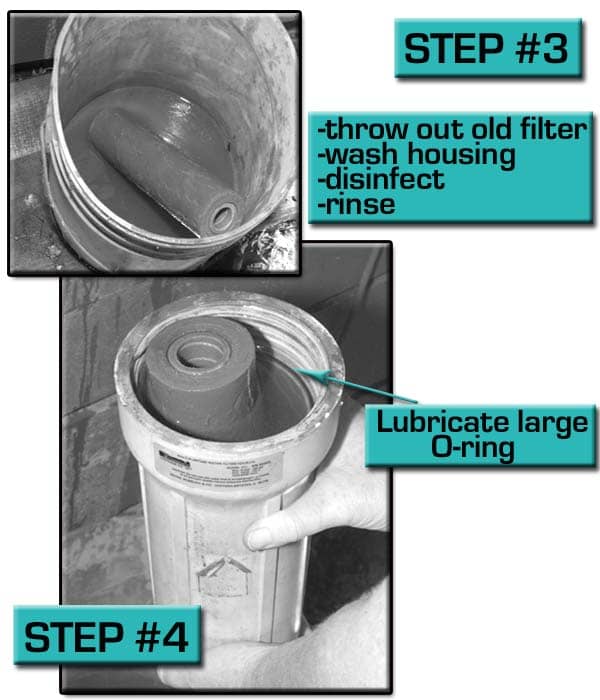
- Remove and discard used filter cartridge. Wash housing with dish soap and warm water. Rinse completely. Make full i/iii with water. Add together about 1 tablespoon of bleach and scrub to disinfect. Rinse thoroughly.
- Lubricate O-ring with clean silicone grease and insert it back into the groove. It is important to make sure the O-band is seated level in the groove. Otherwise, the housing may not have a proper seal.
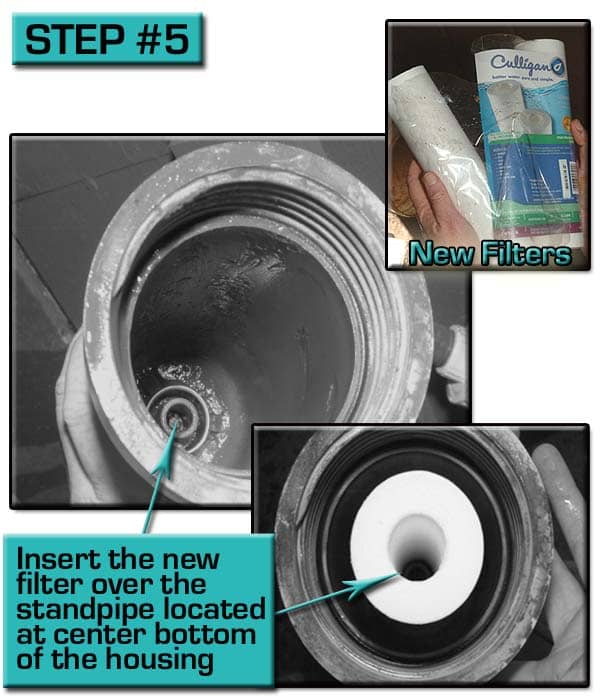
- Supplant the new filter cartridge over the standpipe in the bottom of the housing.
- Spiral housing onto cap and hand-tighten. Do Non OVER-TIGHTEN. Make sure cap standpipe slips into cartridge.
- Turn on the h2o supply. Rotate handle slowly to ON position for valve-in-head units. Press the force per unit area-release button (if nowadays). Check for leaks before leaving installation.
Important Information Regarding Your New Filter Change
After installing the whole-house sediment-filtration cartridge, run the water!
After you have the filter changed and the housing sealed properly, you lot volition need to run your firm water for about 5 minutes before using any. It is a skillful idea to run the tap water for drinking and bathing for about 30 seconds earlier using information technology for whatsoever consumer purpose. Information technology will be apparent that the h2o sediments have found their way into the tap system, as the initial water that pours from your faucets volition probably be a lovely shade of yucky!
Turn Off Water Supply
K9keystrokes
Stride 1: Water Supply Off and Force per unit area Release
Turn off the water supply either at the valve-in-caput or main water feed to the filter. Press the blood-red push button to release any congenital-upwardly pressure, be careful as a stream of water comes shooting out when the release button is engaged.
NOTE: The red button tin be a smashing practical joke tool to use on someone who isn't aware of the thrust of water that shoots from the housing pressure-relief valve. Simply make sure everyone has safety goggles on!
Remove Housing
K9keystrokes
Footstep ii: Remove Housing and Make clean O-Ring
Unscrew the housing unit and remove the large O-ring. The O-ring is in the housing and looks similar a large bore, but thin black rubber band. You will need to wipe information technology clean with a soft cloth and place it to the side until information technology is time to replace it into the housing. Check that it is still in skillful shape, if non, order a new one.
Scroll to Go along
Read More From Dengarden
Lubricate O-Band
K9keystrokes
Step 3: Dispose of Old Filter and Make clean Housing
Remove the dirty old filter and throw it away. Yous volition need to make clean the housing by first rinsing out the bulk of dirt. Then use dish soap and warm water to wash the housing using a low abrasive sponge or material, and and so rinse it completely. Fill the housing 1/3 full with water and and so add together about a tablespoon of bleach to the housing and scrub gently to sanitize the interior surface. Rinse very thoroughly and several times.
Step iv: Lubricate O-Ring
Using a clean silicone grease, lubricate the O-ring completely, existence certain to encompass the inside besides as the outside surface of the o-band. (It is very of import to utilise a silicone-based grease for this application, as the silicone will not cause the prophylactic to swell or soften like a hydrocarbon-based grease will.) Supervene upon O-band back into its groove. Have extra care to properly seat the o-ring or the seal on the housing volition leak, water pressure could degrade, and your water supply could become vulnerable to bacteria.
Install New Water-Filter Cartridge
K9keystrokes
Step 5: Install New Water-Filter Cartridge
Now supplant the filter. Look into the housing and you will see a standpipe positioned at the center lesser. It is a round-shaped molded component with a short plastic-looking pipe protruding (Run across photograph #v). It is of import to fit the filter over this correctly, equally this is the water admission port, thus this is where all of your water will be coming from for filtration before heading to your house taps. Effort to center the filter on the standpipe.
Screw Housing to Cap
K9keystrokes
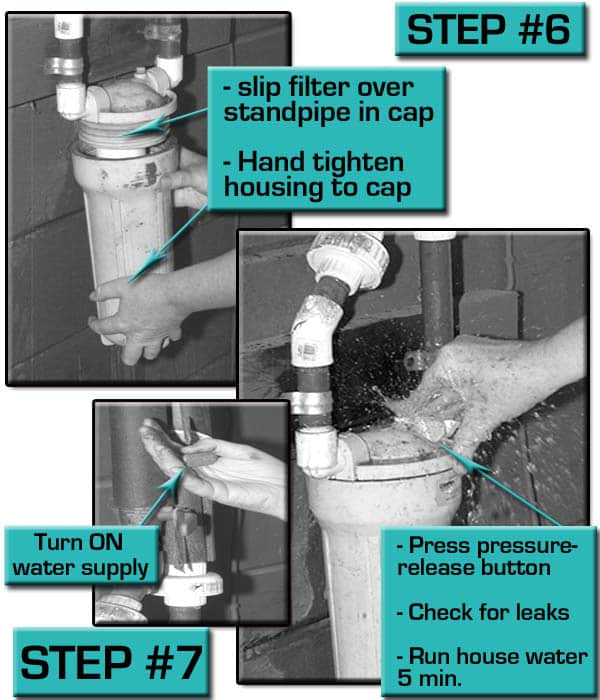
Step 6: Screw Housing to Cap
Supplant the housing with the filter cartridge by manus-screwing it to the cap. Be sure to get the filter centered over the cap'south standpipe. Yous won't necessarily be able to visually position it but you will be able to feel the standpipe slip easily into the cartridge opening. Take care Non to tighten the housing too much, it tin can crack easily.
Stride 7: Plough on Water Supply and Test Pressure
Slowly rotate the inlet handle to plow the water supply back on. Use caution because the water can come rushing in as well speedily, and this tin can blow the housing off and destroy the unit. So, turn the inlet valve slowly and feel as the pressure arrives so you can command information technology while it fills the housing. We replaced a filter with a valve-in-caput unit of measurement, just the same measure of circumspection must exist used for any h2o supply inlet used. Relieve pressure by pressing the red release button, water will rooster- tail out of the unit of measurement so be prepared to become sprayed a lilliputian (or place a towel over the unit while conducting this footstep). Make sure yous have a skillful seal where the housing and cap meet before leaving the unit.
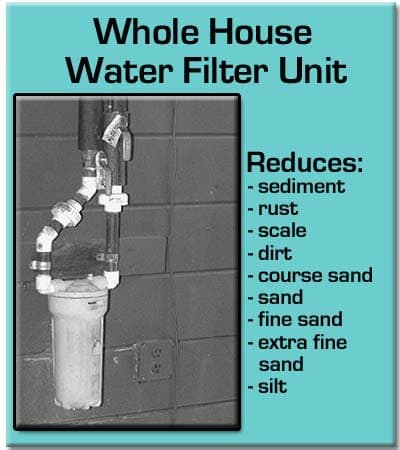
Whole House H2o Filter
K9keystrokes
Water-Filter Cartridge-Replacement Projection Conclusion
After completing the filter replacement projection, nosotros ran the house water for several minutes. When we first opened the faucets, a loud, unfamiliar noise raged from the pipes. Information technology was really startling at first until we realized what the crusade was. The h2o was very muddy looking and spit and sputtered intermittently for some fourth dimension. Fifty-fifty flushing the toilets and testing the shower offered this experience.
We began to inquire the question, "Now what? Another unexpected projection at this old property?" But then we realized all the knocking and spitting stemmed from the air that had gotten into the pipes during the project. It is a common occurrence and one you lot should expect to encounter when changing your water filter cartridge.
This article is authentic and true to the best of the author's knowledge. Content is for informational or entertainment purposes but and does not substitute for personal counsel or professional communication in business, financial, legal, or technical matters.
© 2011 India Arnold
Bharat Arnold (author) from Northern, California on November 30, 2011:
dflood~ Cheque that the large black prophylactic gasket has been seated correctly, and that y'all accept returned the pressure valves (inlet, outlet) to the correct position. If these do non work, you may need to replace your filter housing, or pressure level release button. Good luck!
dflood on Nov 29, 2011:
Did all the steps in a higher place and now water is coming out of the cherry-red pressure release button. What did I practise incorrect?
India Arnold (author) from Northern, California on September 05, 2011:
Chin chin~ Thank y'all for the well wishes, you are very sweet. It pleases me y'all experience that after reading the instruction for changing a whole house water filter in this hub, that you have confidence to do it yourself! I appreciate you lot swinging by today.
Cheers~
K9
Mentum chin from Philippines on September 05, 2011:
Nosotros accept a filtration system installed under our kitchen sink. It looks similar to what you have illustrated hither. I take never worked on it but with your hub guide, I call up I can exercise the filter cartridge change.
Congrats on writing and winning so many plumbing hubs.
Bharat Arnold (author) from Northern, California on September 03, 2011:
PegCole~ Give thanks yous! I hope you give it a attempt yourself if y'all ever take to alter a whole house water filter. Nosotros found information technology pretty easy and kinda fun!
Certain capeesh your back up!
HubHugs~
K9
Peg Cole from North Dallas, Texas on September 03, 2011:
Well documented and illustrated. Very thorough and understandable guide to this plumbing chore. I feel similar I could do this at present.
India Arnold (author) from Northern, California on September 02, 2011:
Penny~ Wow, are you right! I have learned so much by having to do some plumbing things myself; and of grade via my dad'southward brilliance, who has rescued me more than once. Thank y'all for your supportive comments, I really appreciate it!
Thank you~
K9
SimeyC~ Thanks for the congrats and your kind words. I hope you have been enjoying the plumbing competition, equally your winning work has been a wonderful contribution in "how-to"!
Cheers~
K9
Simon Cook from NJ, USA on September 02, 2011:
Awesome hub! There goes the bar mode loftier!!! Great stuff - fully deserves the daily prize!
Republic of india Arnold (writer) from Northern, California on September 01, 2011:
HRoger~ Hey, Thanks then much for the dainty comments and votes! I sure appreciate you stopping by!
Cheers~
K9
HRoger from Online where I can be! on September 01, 2011:
Hey K9 this is a awesome HUB!
Corking information, very creative!
You got all my votes:
Useful (ane)
Funny (1)
Awesome (1)
Beautiful (1)
Interesting (1)
Take care and proceed it up!

How To Install A Culligan Whole House Water Filter,
Source: https://dengarden.com/home-improvement/How-to-Replace-a-Culligan-Sediment-Cartridge-Filter-Models-HF-150-160-360-and-most-standard-sizes
Posted by: trappawkwast86.blogspot.com
0 Response to "How To Install A Culligan Whole House Water Filter"
Post a Comment